While a customer deposit may be something that typically occurs before the start of a job, it is important to know that the Customer Deposit process in BIS is also used when receiving a customer payment that is over the amount of what has been currently billed. The reason for this is that the amount over what has been billed is held in the deposit account and the amount can either be applied to future billings or refunded to the customer, if needed.
The Customer Deposit process consists of two steps:
- Creating a customer deposit
- Applying a customer deposit to customer billings.
This article will cover only creating a Customer Deposit. Apply Customer Deposits will be in a separate article.
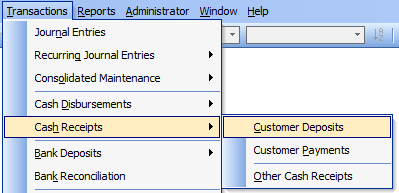
To access the Customer Deposits forms, go to Transactions, Cash Receipts and select Customer Deposits in the menu or click the Customer Deposits hyperlink in the white area of the My Desktop General Ledger folder.
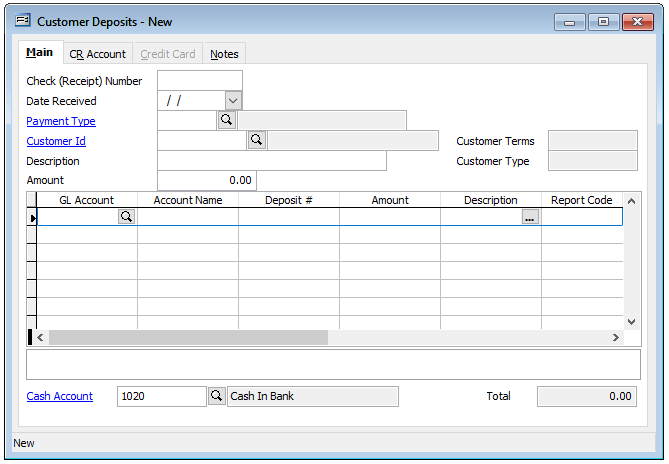
Note: Field Descriptions are listed at the end of this document.
Entering a Deposit
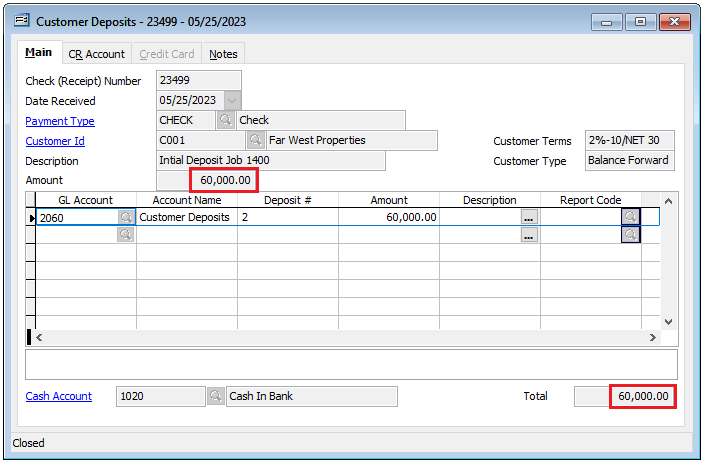
Starting by entering the Check (Receipt) Number, Date Received, Payment Type and Customer Id. Related customer information will populate the corresponding fields.
Next, a description may be added to assist with any special information pertaining to the deposit, if needed. The amount is then entered in the Amount field.
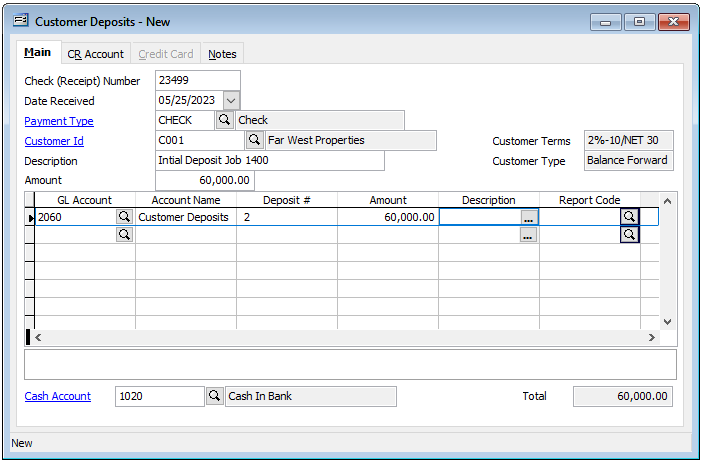
Advancing to the GL Account field, select or enter your liability account for Deposits. Enter a deposit number and advance through to the next line and repeat the steps if additional deposits are to be included in the transaction.
Once all the deposits are entered, verify that the Total field and the Amount field match to ensure the transaction in balance.
Note: The Cash Receipts account may be changed on-the-fly on the CR Account tab, if needed, prior to saving the transaction.
Save the Customer Deposit by either clicking the “Save” icon or Ctrl + S key stroke. The Check Number and Date will appear in the transactions title bar.
Field Descriptions:
Check (Receipt) Number
Records a number that will be used to identify this record. Again, a customer payment may be applied to multiple invoices during one transaction.
Date Received
Records the date that this payment is being applied. This date may be typed or entered using the Calendar tool.
Payment Type
Payment Type selected may indicate the type of payment received and may also select an alternate Cash Receipts account via the Payment Type master record selected.
Customer ID
Records the customer identification number related to this record. The customer ID may be entered manually or by using the Find tool but must be on file in the Customers master file. Once entered, the customer’s name and type will be displayed and all outstanding invoices for that customer will appear available to select when using the Invoice # magnifying glass.
Description
Records a general description for this transaction. This is an alphanumeric field limited to 30 characters.
Amount
Records the amount of the payment to be applied to invoices at this time.
Customer Terms
Displays the payment terms established in the Customers master record for this customer.
Customer Type
Displays the type established in the Customers master record for this customer.
Deposit Distribution Detail
The table records the distribution detail for the deposit selected. The GL Account column records the general ledger account number that this deposit will be credited to, while the Account Name column displays the name of the account selected. The Deposit Number column records a number that will be used to identify this deposit when refunding or applying deposits. A single receipt can be broken into several deposits by entering multiple line items. The Amount column records the amount of the deposit for the deposit number entered. This may be all or a portion of the amount received, as long as all deposit line items balance with the total amount received. The Description column is used to record a brief description for the transaction line item. Clicking the button in this column allows an extended description to be recorded for the item. The Report Code column is used to record a report code related to the line item, which can be used for creating customized reports.
