Use of Direct Deposit, especially for payroll, is increasing. The National Automated Clearing House Association (NACHA), from whose initials the more commonly used “ACH” was derived, governs the standards used by banks nationally.
The first step in setting up Payroll Direct Deposit is with your bank. You need to complete whatever enrollment or forms they may require allowing you to use this service with the bank. Additionally, they may provide you with the information needed by the BIS program that is identified below.
Within BIS, the first step to setting up Payroll Direct Deposit is under Administrator in System Wide Parameters. After obtaining and setting up the Direct Deposit information in System Wide Parameters, you still need to enter each participating employee’s information. That information would include the employee’s bank account number, account type, bank name, and routing number, and is entered in the Employee information under List. Note that the employee can elect to split his or her payments into multiple accounts, each with its own information.
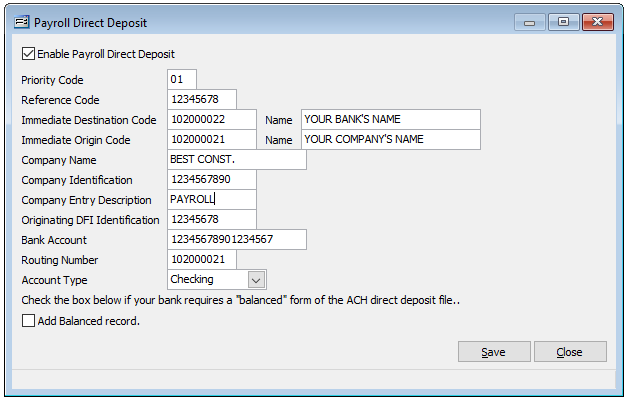
Virtually all of the terminology used on this screen is taken directly from the manual, ACH Rules.
The bank can provide virtually all of the information needed to complete this screen. However, personnel at some local branches may not have the expertise to provide all of the correct information. Since these transactions take place electronically, either by modem, via an e-mail attachment, or magnetic media, a single specialized department at the bank’s primary location usually handles them. Thus, you may need to contact that department directly for the accurate information you will need. Your local branch should be able to provide you with that contact information.
The fields are left justified if the data is less than the character length provided.
The fields used in BIS and their definitions are as follows:
Priority Code: This is a required two-digit code that is, as of this writing, unused. However, the number 01 must be entered.
Reference Code: This code is up to eight digits but is not required by the ACH system. Some companies use their own system, including dates for this code.
Immediate Destination Code: This mandatory field contains the Routing Number of the ACH Operator or receiving point to which the file is being sent. Though this is a 10-digit field, only 9 can be manually entered in BIS, since the first position is supposed to be blank. This field information is supplied by the bank and follows a particular format.
(Immediate Destination) Name: This optional field contains the name of the ACH operator or receiving point for which that file is destined. It is 23-digits long and is supplied by the Bank.
Immediate Origin Code: This mandatory field contains the Routing Number of the ACH Operator or sending point that is sending the file. Though this is a 10-digit field, only 9 can be manually entered in BIS, since the first position is supposed to be blank. This field information is supplied by the bank and follows a particular format.
(Immediate Origin) Name: This optional field contains the name of the ACH operator or sending point for which that file is destined. It is 23-digits long, is optional, and is supplied by the Bank.
Company Name: This mandatory 16-digit field can contain the ordinary company name.
Company Identification: This mandatory 10-digit field is an alphanumeric code used to identify an Originator. If the user intends to enter the company Federal Employer Identification Number (FEIN), the number must be prefixed with a “1”. However, if the entry is to be some other numbering system (other than DUNS), the first position will be a “9” for “User Assigned Number.” Again, the bank can be helpful in suggesting the entry.
Company Entry Description: This mandatory 10-position code is entered by the Originator to provide a description of the purpose of the entry to be displayed back to the Receiver. The bank will provide this description.
Originating DFI Identification: This mandatory 8-position code is the Routing Number used to identify the DFI originating entries within a given batch.
Bank Account (DFI Account Number): This required 17-position code is the Bank Account Number of the ACH Operator that is sending the file. It is obtained from the MICR line of a voided check, from a bank statement or passbook, or other source document that specifically designates the account number to be used for ACH purposes. This entry can be numbers and hyphens.
Routing Number (of ACH Operator): This mandatory 8-position code is the Routing Number of the ACH Operator that is sending the file.
Account Type: This is a BIS program selection item of two potential choices: Payroll and Savings. Choosing one or the other is mandatory.
Below are some other definitions that may help:
ACH: Automated Clearing House (from National Automated Clearing House Association)
DFI: Depository Financial Institution
ODFI: Originating Depository Financial Institution
RDFI: Receiving Depository Financial Institution
Note: Your bank may require a “balanced” account to successfully process a direct deposit file. If so, check the “Add Balance record” checkbox in the lower left. Please confer with your bank to determine their needs in this matter.
After completing the information needed in the Direct Deposit section of the PR tab of System Wide Parameters, it is necessary to enter the individual employee information needed.
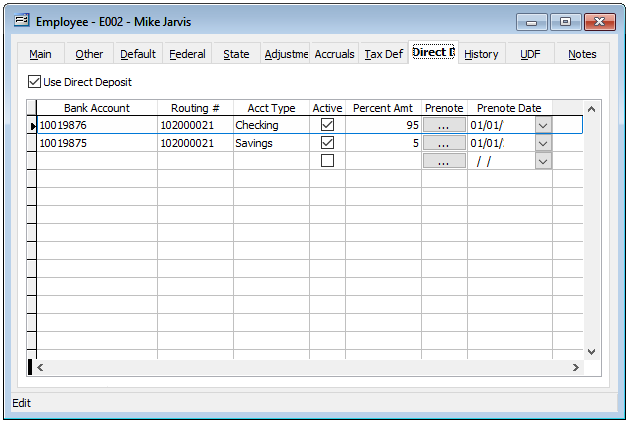
Please note that the Direct Deposit authorization must be checked in the upper left-hand part of the form. Next, the applicable bank account number, routing number, and account type must be entered. Note that the employee is NOT limited to just one account, but can choose any number of accounts, as long as the total distribution adds to 100%.
Once the information entered is verified as correct, click on the Prenote button to create a Prenote for the employee’s (and company’s) transmittal data. An employee’s information can be appended to a pre-existing Prenote for a single transmission to the bank.
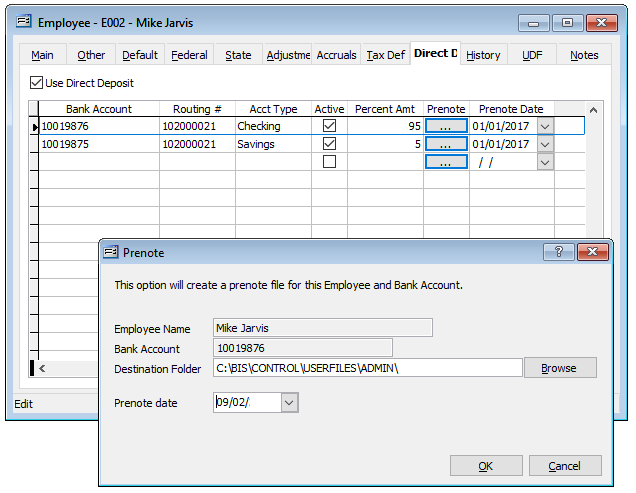
The Prenote, like the any actual Direct Deposit file should be saved in a location that can be easily found using the transmission method preferred by the user and/or the bank. Transmission methods include modem dial-up, a secure website, and various levels of secure FTP Internet transmissions.
If the system finds a pre-existing Prenote, it will offer to append the information. Otherwise, the system will prompt for a location of the file.
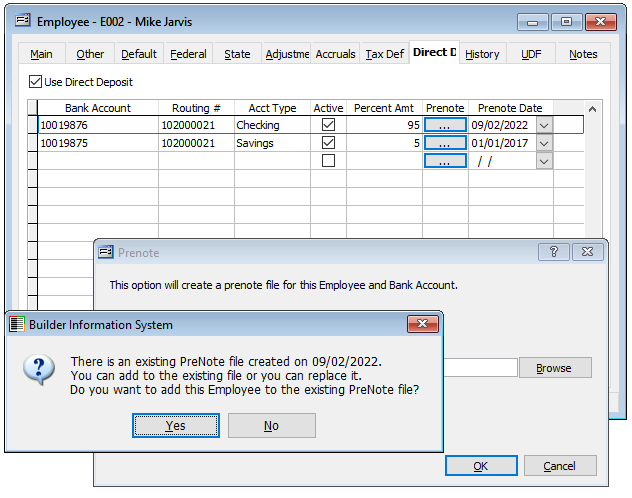
Once the file is successfully created (or appended), a message will confirm.
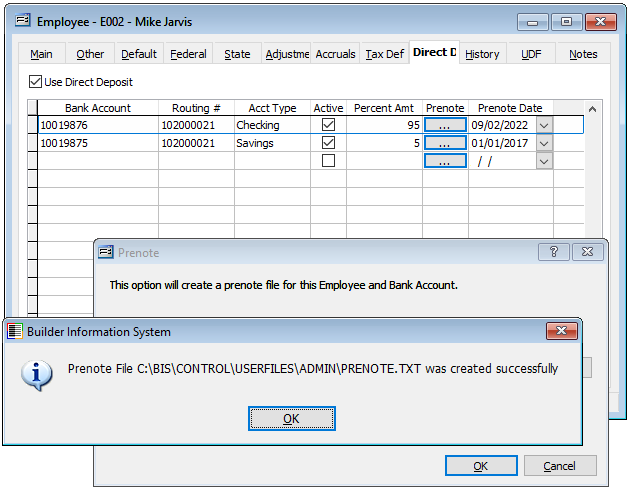
Then, using the transmission method chosen, the Prenote Direct Deposit file created by BIS will need to be selected, and sent to the bank.
After the bank receives the Prenote, it should provide the user with a report indicating any of three states: That the file was successfully processed, that the file had non-fatal errors and was processed, or that the file has fatal errors, and the setup needs to be modified.
Non-fatal errors can result from the bank using special, unique settings in the file not specified, but allowed by NACHA. In those cases, the bank software either notes the exception or alters the Prenote or Direct Deposit file to allow processing. In these cases, the user does not need to make any changes to the BIS Direct Deposit setup.
If the bank reports fatal errors, it will usually provide a report indicating the errors. Obviously, once the user’s company information is correct, it will not likely create subsequent errors. Subsequent errors usually result from errors entering employee data.
Payroll is processed normally. However, when the user goes to the Print Payroll Checks function, the screen offers a box to check to create the Direct Deposit File. This will be the file that is provided to the bank via the selected transmission method.
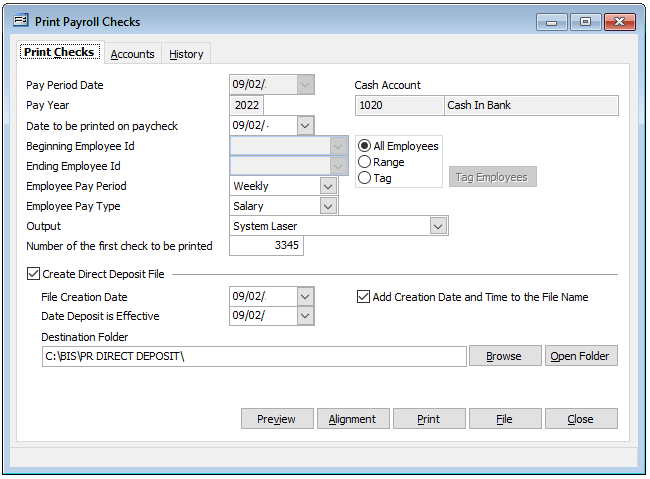
However, the employee will still receive a check “voucher form” that will be a non-negotiable check. It will contain the stub with the normal information provided to all employees who receive a normal, negotiable check.
