Form Modification Section
Overview
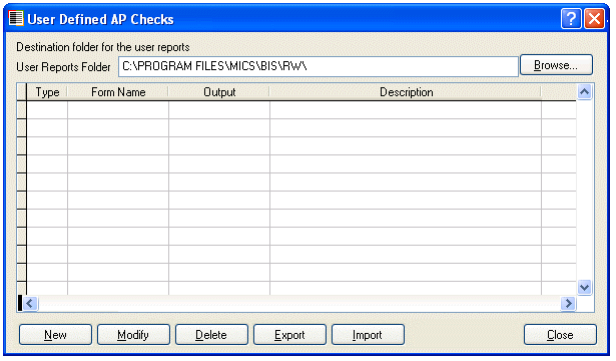
The forms may be found on the User Preferences/Forms& Printers tab or User Preferences/User Preferences/App for Payment tab to modify the related Application for Payment forms. Click the ellipse ( ![]() ) button next to the form Type to be modified. These modifications are managed through the User Defined Forms screen above. New user defined forms are based on forms set as the default Type on the User Preferences, Forms tab. New versions of selected form are created and modified through the Report Designer. All user defined forms listed here will be available to select and set as the default Type for the particular form on the User Preferences, Forms tab.
) button next to the form Type to be modified. These modifications are managed through the User Defined Forms screen above. New user defined forms are based on forms set as the default Type on the User Preferences, Forms tab. New versions of selected form are created and modified through the Report Designer. All user defined forms listed here will be available to select and set as the default Type for the particular form on the User Preferences, Forms tab.
User Reports Folder
This folder, or location where user defined forms are stored, must be specified the first time you use the Report Writer, User Defined Forms section. The folder may be on your local hard drive or on a network drive. Consult with your System Administrator for the best place to locate this folder.
Browse Button
Allows you to see local and network drives for easier selection of the User Reports Folder.
User Defined Forms Grid
Displays the type of form, form name as it is known for management purposes, the output type (laser or continuous) and the description entered by the user at the time of the form creation.
New Button
This button will allow you to add a new user defined form for this forms type. A form name and description will be asked for prior to adjusting the new form’s layout.
Modify Button
This button will allow you to modify any existing user defined form. Select any form and press this button. The Report Designer used to create the new form is part of Visual FoxPro.
Delete Button
Using this button will completely erase the selected user defined form. Be sure you have no need for the form before using this button.
Export Button
This button will create a zip file for the selected form. This is not an export of the data, but the form creation parameters. With this function, custom form may be exported for use in other BIS systems.
Import Button
This button will allow you to import any custom form not created in the current running version of BIS. Any file you wish to import should be moved to the RW Reports Folder prior to import.
Close Button
This button will close the User Defined Forms screen and allow you access to the rest of the BIS program.
Table Section
Overview
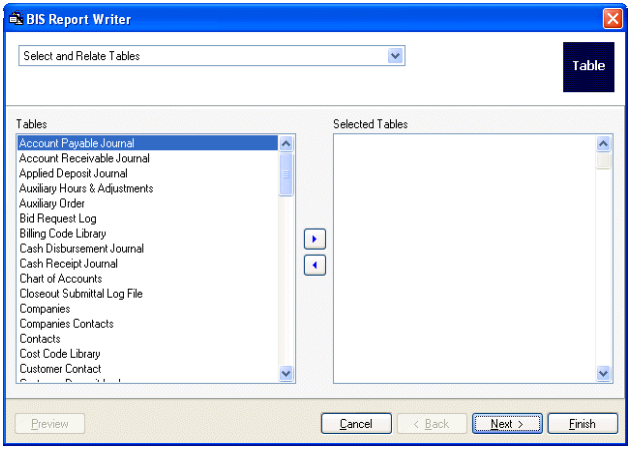
BIS stores all entered data in tables, much like you would see on an Excel spreadsheet. The first step in creating your own custom report is to choose the table that has the information you want to access. All tables have been given logical names to make choosing the correct table easier.
Tables
This section is where you choose what related tables you want to pull information from. To select a table, highlight it and press the right arrow button in the middle of the screen. Sometimes related tables are available after you make your first selection. If you wish to display information from these tables, select them as well.
Selected Tables
This section displays all selected tables from which a report can draw its information. To add a table, highlight it in the Tables section and use right arrow in the middle of the screen. In a like manner, tables may be un-selected by highlighting them and pressing the left arrow in the middle of the screen.
Common Report Writer Buttons and Controls
To learn more about the buttons and other controls common to Report Writer found on this screen, go to the “Common RW Controls” section.
Field Section
Overview
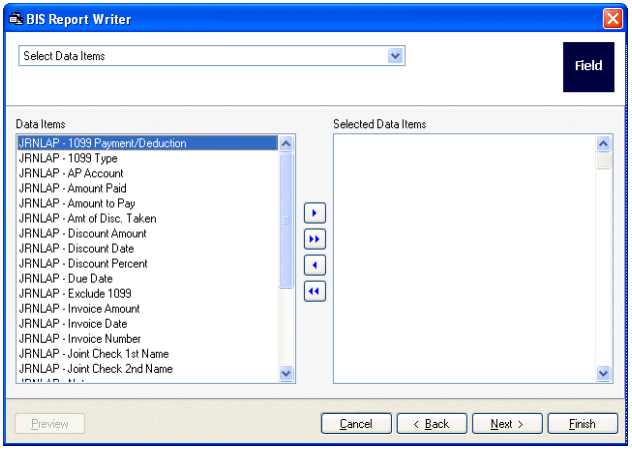
The field selection step of the custom report generation process allows you to choose exactly what information you want to appear on your reports. The first few fields you choose for a custom report, for example, could be Vendor ID, Invoice Number and Invoice Date from the Accounts Payable Journal. The order you choose these items or fields in is important. Items will appear from left to right on the report according to the order in which you have chosen them.
Data Items
This section allows you to choose which specific items from the selected tables you want to see on your report. The first 4 letters generally contain the table designation, while the item name follows. At least one item or field must be chosen from each table selected in the previous screen. Items may be selected by highlighting them and pressing the right arrow in the middle of the screen.
Selected Data Items
This section displays all selected items/fields from which a report will draw its information. To add an item, highlight it in the Data Items section and use right arrow in the middle of the screen. In a like manner, items may be un-selected by highlighting them and pressing the left arrow in the middle of the screen.
Common Report Writer Buttons and Controls
To learn more about the buttons and other controls common to Report Writer found on this screen, go to the “Common RW Controls” section.
Sort Section
Overview
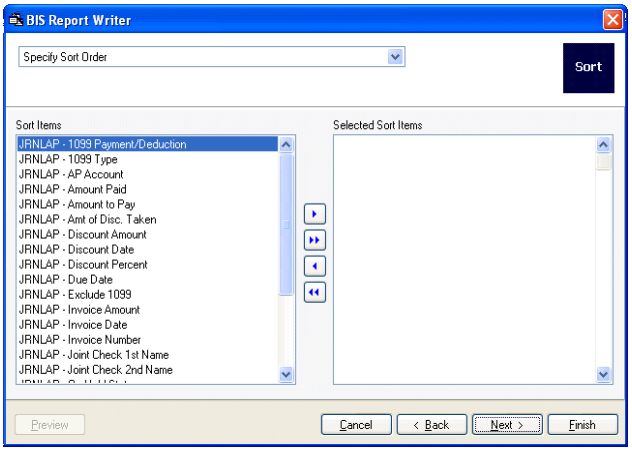
Creating a sort order for your report allows for a better structured report that is easier to understand. Sorting Vendor Invoices by Vendor and then Invoice Date, for example, will produce a report that has all invoices listed for a vendor together, then listed in order of the date in which it was received. Selecting a sort order is typically not a required step for creating custom reports. You may sort reports by as many fields as you want. The field choice is only limited to the tables which you have chosen.
Sort Items
This section allows you to choose which specific items you want to sort by. From the Accounts Payable Journal, for example, you may wish to sort by Vendor ID, then Invoice Number, then Invoice Date. Several Sort Items may be chosen. The first 4 letters of an item generally contain the table designation, while the item name follows. Items may be selected by highlighting them and pressing the right arrow in the middle of the screen.
Selected Sort Items
This section displays all selected items/fields that the report will be sorted by. The report will be sorted by the first selected item, then the second and so on. To add an item, highlight it in the Sort Items section and use right arrow in the middle of the screen. In a like manner, items may be un-selected by highlighting them and pressing the left arrow in the middle of the screen.
Common Report Writer Buttons and Controls
To learn more about the buttons and other controls common to Report Writer found on this screen, go to the “Common RW Controls” section.
Group Section
Overview
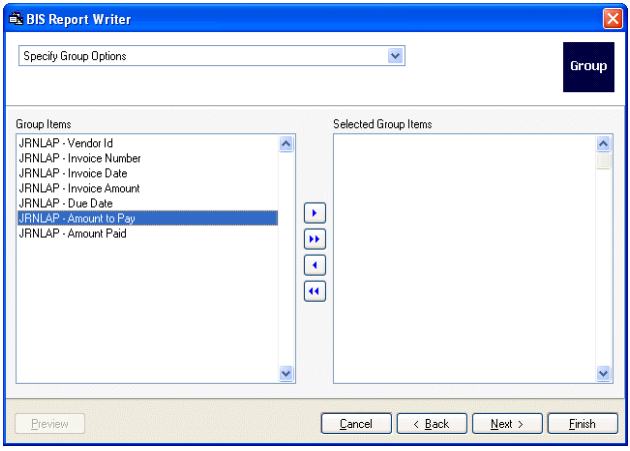
Selecting a group for your custom report will allow you to effectively breakdown the presentation of the information in the report. Invoices, for example, could be grouped by Vendor ID. This would produce bold subsections on the report with the Vendor ID, followed by all invoices associated with that vendor. Selecting a group is typically not a required step for creating custom reports. You may group reports by as many fields as you want, however, because multiple groups may make your report somewhat messy, we suggest only selecting one or two groups. The group choice is limited to the sort items that you chose in the previous step.
Group Items
This section allows you to choose which specific items you want to group by. From the Accounts Payable Journal, for example, you could choose to see all invoices grouped by Vendor ID. Only items sorted may be chosen for grouping. The first 4 letters of an item generally contain the table designation, while the item name follows. Items may be selected by highlighting them and pressing the right arrow in the middle of the screen.
Selected Group Items
This section displays all selected items/fields that the report will be grouped by. It is generally a good idea to select only one or two groups, as more can make the report confusing. To add an item, highlight it in the Group Items section and use right arrow in the middle of the screen. In a like manner, items may be un-selected by highlighting them and pressing the left arrow in the middle of the screen.
Common Report Writer Buttons and Controls
To learn more about the buttons and other controls common to Report Writer found on this screen, go to the “Common RW Controls” section.
Filter Section
Overview
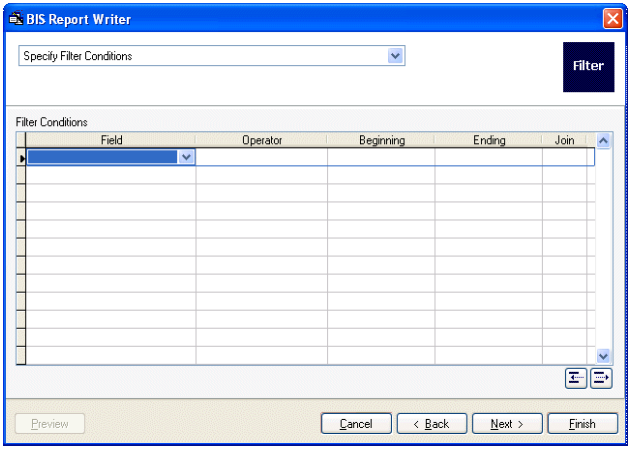
By establishing information filters in the report creation process, you can save the time it takes to filter reports every time to print or preview them. You can filter reports by any item that exists on the tables you have chosen for the report. Filters use “Operators” just like the rest of BIS. You could display invoices only relating to Vendor 0201 for example. Filters can also be combined with other filters to select specific target data. Creating filters for your custom report is an optional step.
Filter Conditions
The filter section allows you to specify any parameters for the fields in the tables you have selected. By using these operators and specifying values or ranges, you can get exactly the information you want on the report. Filter Conditions may also be finished with statements like “And”. This allows you to combine multiple filters on a single report. Filters chosen here are also applied to reports while printing or previewing them. The filters appear as default filters for the print and preview screens of the custom report.
Insert Line
This button allows you to insert a line for the table above.
Delete Line
This button allows you to delete a selected line for the table above.
Common Report Writer Buttons and Controls
To learn more about the buttons and other controls common to Report Writer found on this screen, go to the ‘Common RW Controls’ section.
Output Section
This section allows you to adjust the paper orientation for the report (both in printing and previewing the report) and specify the inclusion of total or subtotals for numeric values on the report. Altering the output screen is an optional step in creating custom reports.
Orientation
Portrait or Landscape options allow you to specify the physical orientation of the report page for printing or previewing.
Subtotals Button
This button will bring up the Report Totals and Subtotals screen. This screen allows you to specify whether or not the report calculates total and/or subtotals for numeric fields.
Common Report Writer Buttons and Controls
To learn more about the buttons and other controls common to Report Writer found on this screen, go to the ‘Common RW Controls’ section.
Finish Section
Overview
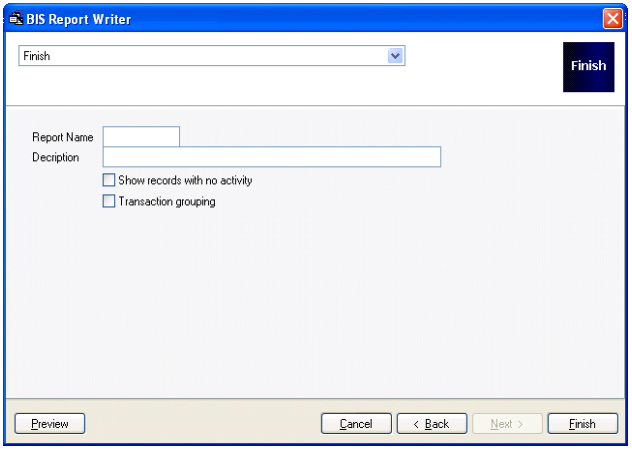
This final screen in the process for creating/editing custom reports lets you name and title your report. Options are also available that affect the look of the report greatly. Note: The Finish button on this screen will ask you if you want to save your report and then return you to the Report Manager.
Report Name
Records the report name, as it will appear in the Report Manager. This is an alphanumeric field limited to 8 characters.
Report Title
Records the report title, as it will appear in the Report Manager. This is also the title that will be seen on top of the report when printing or previewing.
Show records with no activity
When this option is selected, information will be displayed for all items, regardless of whether or not there is information contained in each selected table for the item.
Transaction Grouping
When this option is selected, all information for a single transaction will be grouped together. Reports created with this option have transaction header information listed in a columnar format, with detail listed in a tabular format underneath.
Common Report Writer Buttons and Controls
To learn more about the buttons and other controls common to Report Writer found on this screen, go to the “Common RW Controls section.”
Layout Section
Overview
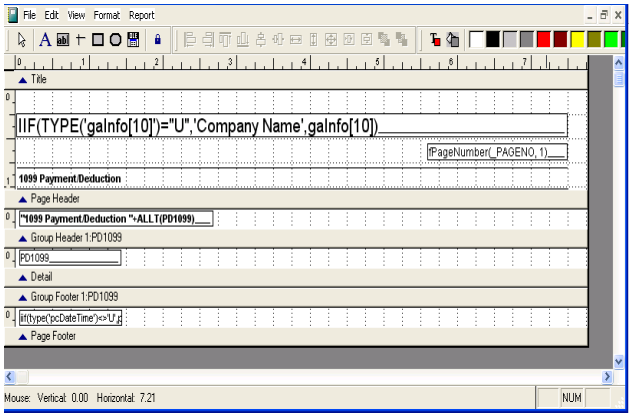
BIS uses Visual FoxPro’s native report designer as a means to adjust the layout of existing forms and custom reports created with Report Writer. Your local bookstore should have resources available specific to this design environment. This section will give you a brief overview of some of the most common adjustments that can be made to the look and feel of forms and custom reports.
Getting Rid of Unwanted Items
Unwanted fields, lines, labels and so forth may be deleted by selecting an item (left-clicking on it) and then pressing the Delete key on your keyboard.
Changing Fonts
A font may be changed by selecting the item and then going to the Format, Font menu item.
Adjusting Item Colors
The foreground or background color may be changed on any item by highlighting it, pressing the foreground or background tool on the toolbar ( ![]() ) and selecting the new color from the same toolbar. Custom colors may be created by using the (
) and selecting the new color from the same toolbar. Custom colors may be created by using the ( ![]() ) button.
) button.
Changing Label Text
The text of any label may be changed by pressing the button and then selecting the item.
Moving Items
An item may be moved by selecting it and using the mouse to reposition it or by selecting it and using the arrow keys on your keyboard to reposition it.
Creating Shapes
By selecting one of the shape buttons ( ![]() ) and then dragging your mouse, while holding the left mouse button down, you can create lines, boxes and circles.
) and then dragging your mouse, while holding the left mouse button down, you can create lines, boxes and circles.
Adding Graphics
Any graphic may be added to your report or form to give it a more professional feel. These graphics should be in jpg, gif or bmp format. Simply push the ( ![]() ) button on the toolbar and drag your mouse, while holding the left mouse button down, to create a place for the graphic. Be sure to use the, “If picture and frame are different sizes” options to better incorporate the image.
) button on the toolbar and drag your mouse, while holding the left mouse button down, to create a place for the graphic. Be sure to use the, “If picture and frame are different sizes” options to better incorporate the image.
Adjusting the Layout for Multiple Items
Several items may need to have their layout adjusted at once. You can select which items you wish to adjust by holding the Shift key down and selecting them in the normal fashion. Then use the Layout toolbar adjust the overall layout. ( ![]() )
)
Saving the New Layout
To save the new layout of and existing form or custom report, simply exit the Report Designer by pressing the ( ![]() ) button. You will be asked if you wish to save the modifications.
) button. You will be asked if you wish to save the modifications.
